
Want to create a professional talking head video but not sure where to start? In this guide, CINEFY breaks down the exact camera setup, lighting configuration and audio recording setup used by professionals — so your talking head video looks polished and credible from the very first frame. Whether you're recording a brand spokesperson video, an expert interview or a product explainer,

🎯 What Is a Talking Head Video?
A talking head is a video format in which the speaker (host, CEO, expert, or influencer) looks directly into the camera or toward an interviewer and delivers content. You see this format everywhere: YouTube vlogs, training videos, product demos, video podcasts, and corporate communications.
Fun fact: these techniques will elevate your production quality significantly.
📷 Camera Setup: Getting the Angle Right
Camera Height
Position the camera at eye level or slightly above. Avoid going too low (unflattering upward angle) or too high (forces the subject to look up).
Focal Length
Use 50–85mm (full-frame equivalent) for natural-looking facial proportions and pleasing background separation. Avoid wide angles below 35mm — they distort the face.
Framing
Medium close-up (chest up) is the most common framing. Leave appropriate headroom — don't crop the forehead, but don't leave too much space above either.
Background
The background should be clean and have depth. A bookshelf, plants, or a studio cyc wall all work well. Avoid a plain white wall — it looks dull and flat.
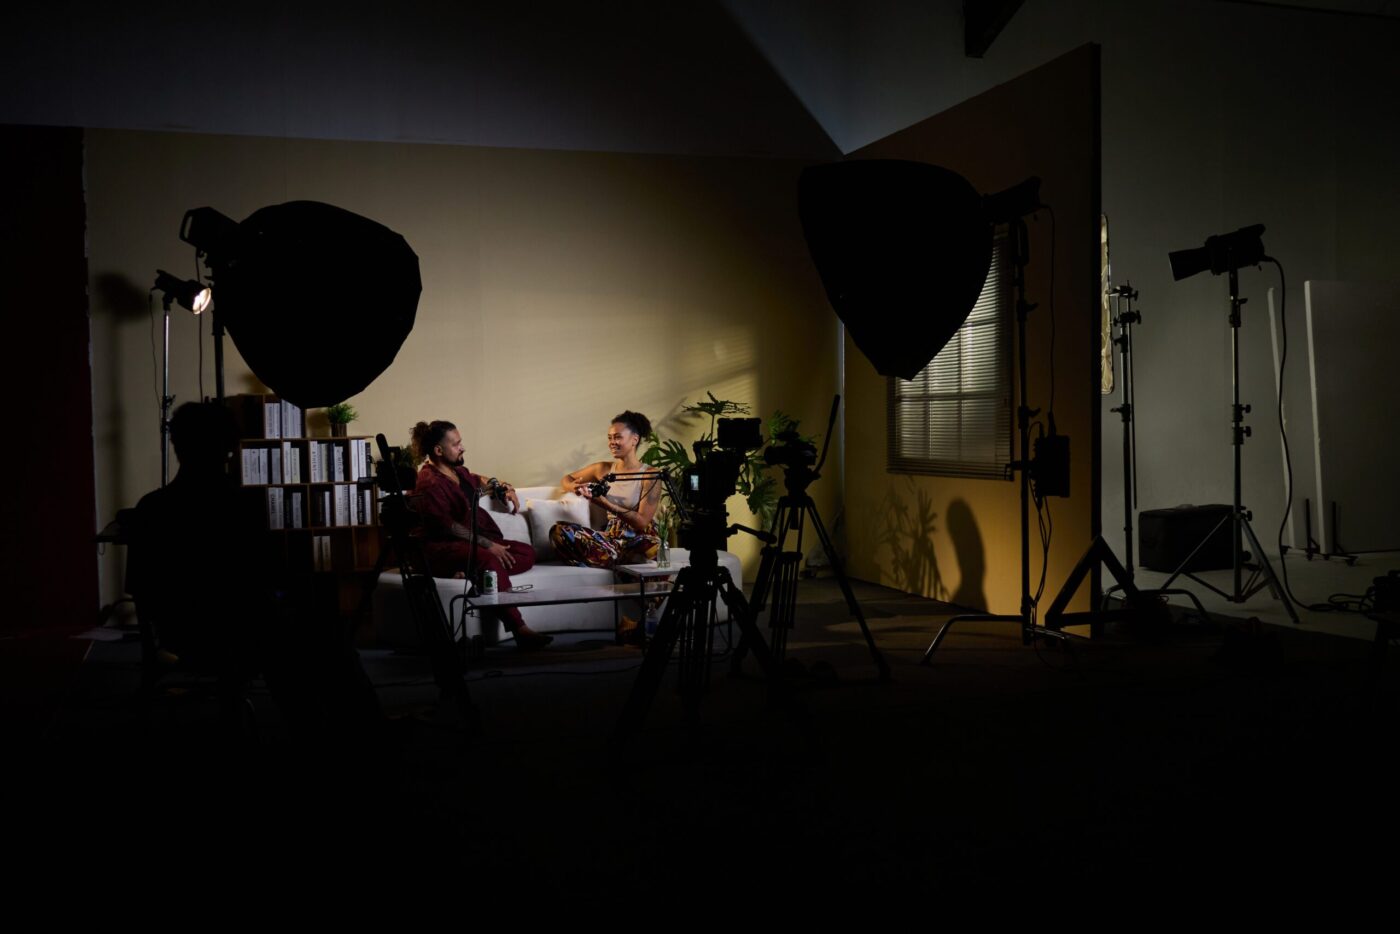
💡 Lighting: Key Light, Fill & Back
Lighting is the single most important factor in talking head video quality. Even the most expensive camera will produce amateur-looking results with bad lighting.
Key Light
The primary light source, placed at a 45° angle to the face. Use a softbox or large LED panel. This is the main light illuminating the subject's face.
Fill Light
A secondary light opposite the key, 1–2 stops dimmer. Its purpose: soften facial shadows and prevent overly harsh contrast.
Back/Hair Light
A light positioned behind the subject aimed at the shoulders and hair. It creates a rim of light that separates the person from the background — instantly looks more professional.
💡 Pro tip: Here is the complete professional setup guide for talking head videos.
🎙️ Audio: Don't Overlook It!
Viewers can tolerate mediocre video quality, but bad audio and they're gone immediately. This is the most overlooked part of the setup — and the most important.
Lavalier (Lav) Mic
A small clip-on microphone hidden on the collar — positioned close to the mouth. Wireless lavs like the Rode Wireless GO or DJI Mic are ideal. The most popular audio choice for talking head shoots.
Shotgun Mic + Boom
A directional mic mounted on a boom pole, held just above the subject's head outside the frame. More natural sound than a lav — widely used in film and TVC production.
Room Treatment
A reverberant room will destroy audio quality. Shoot in a soundproofed studio or use acoustic panels. At minimum: draw the curtains, add rugs, and avoid bare rooms.
🎬 5 Pro Tips for Talking Head Shooting
Use a Teleprompter Smartly
If reading a script, use a teleprompter app (PromptSmart, Teleprompter Premium). Auto-scroll syncs to speech pace — looks completely natural.
Shoot Multiple Takes
Don't try to nail it in one take. Shoot multiple rounds and pull the best moments from each. Post-production will cut it together smoothly.
B-Roll Is a Must
Intercut the talking head with B-roll (supporting visuals, products, behind-the-scenes). It makes the video more dynamic and covers jump cuts.
Dress for Camera
Avoid fine patterns and small stripes (moiré effect on camera). Solid, dark, or neutral tones work best. Avoid pure white — it overexposes the chest area.
Energy & Eye Contact
Look directly into the lens (not the screen!). Deliver with about 20% more energy than feels natural — on camera, everything reads flatter than in real life.

❓ FAQ
How many lights do I need for a talking head shoot?
Minimum one large softbox. Ideally three lights (key + fill + back). At CINEFY Studio, we set up all three for every booking.
Should I shoot in 4K or 1080p?
Shoot 4K and deliver 1080p. You can crop and reframe in post without quality loss — extremely useful when creating multiple formats (landscape, portrait, square).
Can I shoot a talking head on a smartphone?
Yes! iPhone 15 Pro or newer, or a Samsung Galaxy S24 Ultra, can produce excellent results. But you still need good lighting and an external mic. Great camera + poor lighting = poor video.
More Questions
How much does a professional talking head video cost?
At CINEFY, talking head videos start from 5-15 million VND including studio time, professional lighting, audio setup, and basic editing.
What background works best?
Clean, non-distracting backgrounds: solid color backdrop, cyclorama wall, or styled bookshelf. Slight background blur adds cinematic feel.
Do I need a teleprompter?
Helpful for scripted content but not always necessary. Bullet points often work better for natural delivery. CINEFY provides teleprompter on request.
Related Articles
Need a Professional Talking Head Shoot? 🎬
CINEFY Studio — lighting, camera & audio all set up and ready for you